February 8th, 2010

Flamingo Valentine
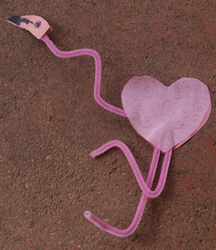
One of my son’s school friends made him this sweet heart-shaped flamingo Valentine. It’s fun to bend the legs and neck and “pose” the flamingo!
What You Need: Pink pipe cleaners; pink cardstock or construction paper; pink patterned paper (optional); heart shaped template or punch (or freehand or trace a heart); black marker; googly eye; glue.
How to Make It: Cut out two hearts that are the same size. Bend pipe cleaner as shown to make neck and legs (for a large flamingo, you may need two pipe cleaners; for a small one you’ll want to cut one apart). Glue two hearts together, securing the pipe cleaners in the process. Cut two head shapes (an adult may want to make a template for the kids). Use black marker to make bill. Glue on googly eye(s). Glue head pieces together at the end of the neck. Bend pipe cleaners to position head and legs. Child can write name or Valentine message on one side of the flamingo.
Tags: flamingo crafts, flamingos, preschool crafts, Valentine, Valentine's Day, Valentine's Day crafts
Posted in animal crafts, Valentine and heart crafts | 1 Comment »
December 20th, 2009

Cone-shaped Santa craft
Let preschoolers suit up their own smiling Santa Claus with this easy Christmas craft made with supplies you probably already have on hand. He can even top the Christmas tree!
What You Need: 8 1/2″ square red construction paper; approx. 2 1/2″ circle from pink construction paper; 1″ strip black cardstock; 1″ wide yellow rectangle (pre-cut or let children cut with safety scissors); 2 googly eyes; pink or red crayon; cotton balls; staples or tape; glue.
How to Make It: Adult helps child twist red cardstock into a cone shape and secure with staples or tape. Then child uses crayon to draw nose and mouth on pink construction paper. Glue on eyes. Child then uses glue to adhere Santa’s belt, cotton ball beard and cap tassel.
Tags: Christmas crafts, cotton ball crafts, preschool crafts, Santa crafts
Posted in Christmas crafts | 1 Comment »
November 21st, 2009

Thankful turkey craft
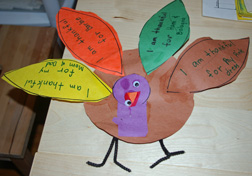
Children can share what they’re thankful for with this easy craft, which is great for preschool or day care, or as a kids’ table activity on Thanksgiving Day with the family.
What You Need: Large brown construction paper circle; small purple construction paper circle; small purple construction paper rectangle; four or five colorful feather shapes. (You can precut all of these or trace them and have the kids do it.); scrap of orange construction paper; 2 googly eyes; black pipe cleaners; scissors; glue.
How to Make It: Ask child to dictate several things he or she is thankful for. Write them on the pointy oval “feathers.” Child can then assemble the turkey as shown. Bending lengths of pipe cleaner outward makes the feet.
Tags: preschool crafts, Thankgiving crafts, turkey crafts
Posted in Thanksgiving crafts | No Comments »
November 15th, 2009

Footprint turkey craft
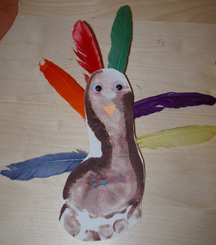
You’ve heard of tracing a kid’s hand to make a Thanksgiving turkey, but how about a footprint? This craft is a great activity for preschoolers as well as a keepsake for parents.
What You Need: White butcher paper or construction paper; nontoxic brown paint; 2 googly eyes; scrap of orange construction paper; 6 colorful feathers; glue; tape; paintbrush; scissors.
How to Make It: Brush paint onto child’s foot (this generally works a little better than having them step in the paint, but that’s fine, too.) Have child step on white paper without wiggling, and then pull off in one motion. Let dry. Cut out foot shape. Glue on googly eyes and orange triangle beak to heel. Attach feathers to back with glue or tape.
Tags: footprint crafts, preschool crafts, Thanksgiving crafts, turkey crafts
Posted in handprint and footprint crafts, Thanksgiving crafts | No Comments »
October 26th, 2009

Candy corn clay pot craft
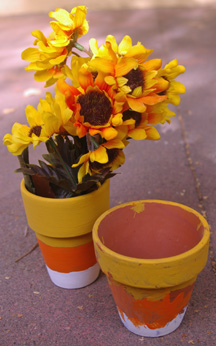
This clay pot craft is a fun fall or Halloween project for a little kid or the whole family. Remember, don’t get hung up on perfection!
What You Need: 1 small clay pot; pencil; orange, yellow and off-white acrylic paint; paint brushes.
How to Make It: Using pencil, divide clay pot into three sections. Letting paint dry between each color, paint the pot in the order of candy corn. Then, use it for real or artificial flowers, or line and and fill it with candy. Makes a great centerpiece!
Tags: candy corn, clay pot crafts, Halloween crafts
Posted in fall crafts, flower crafts, Halloween crafts | No Comments »


